by Dan Fink  Photo by Tim Fecteau This article was orginally published in the July, August and September 2005 issues of the Energy Self Sufficiency Newsletter. DanF writes a monthly wind power column for the ESSN, and we at Otherpower.com highly recommended this publication for anyone interested in renewable energy. The ESSN focuses on homebrew and do-it-yourself projects instead of the expensive turnkey installations seen in many other magazines. Best of all, it's free! You can download both the current issue and back issues HERE. Wind power is taking off in a big way worldwide, in both giant utility-scale installations and small-scale turbines intended to power a single home. Remote off-grid dwellers are finding wind power an excellent supplement to solar during cloudy weather, and enjoying the extra freedom that more power input gives, especially after dark or during cloudy weather. On-grid folks are installing home wind turbines to offset rising power costs, and even selling extra power back to the utility. Judging from the volume of questions received about wind power, there are many misconceptions amongst people out in the real world. Even though the physical laws and formulas governing wind power have been well understood for over 150 years, it has taken new fears about falling oil production, rising gas prices, and global climate change to generate the growing interest in wind power we have now with the general public. In this article an attempt to explain the basics of how power is extracted from the wind, to help readers understand how much power they could expect from turbines of different sizes. Go to: Part 1 | Part 2 | Part 3 | Meet the Writer Part 1 (July 2005) online at http://www.otherpower.com/windbasics1.html
How small wind turbines work A wind turbine extracts energy from moving air by slowing the wind down, and transferring this harvested energy into a spinning shaft, which usually turns an alternator or generator to produce electricity. The power in the wind that's available for harvest depends on both the wind speed and the area that's swept by the turbine blades. Caution: Mathematics ahead! But it's pretty simple, and if you are armed with a pocket calculator and some simple formulas and concepts, you should be able to make a wise choice in selecting a wind turbine, and be able to reject unsuitable products and detect scams. I apologize in advance for mixing metric and standard units! Power available in wind (in Watts) = ½ * AirDensity * SweptArea * (WindVelocity3) where: • AirDensity = 1.23 kg per cubic meter at sea level (1.0 here in Colorado) • SweptArea is in square meters • WindVelocity is in meters per second If we work the formula for a 5-foot diameter turbine in a 10 mph wind: • 5 feet = 1.524m • SweptArea = pi * r2 = 1.8241m2 • WindVelocity = 10 mph = 4.4704 m/s So
The first key concept that this formula shows is that when the wind speed doubles, the power available increases by a factor of 8. That means there's very little power available in low winds. Increase the wind speed for this 5-foot rotor to 20 mph (8.9408 m/s) and we get:
The only way to increase the available power in low winds is by sweeping a larger area with the blades and that's the second key concept from this formula. Power available increases by a factor of 4 when the diameter of the blades doubles. If we use a 10-foot (3.048m) diameter rotor for a 7.30 m2 swept area in a 10 mph wind, we get:
and in a 20 mph wind:
However, there's no way to harvest ALL of this available energy and turn it into electricity. In 1919 a gentleman named Betz calculated that there's a limit to how much power a turbine blade can extract from the wind. Beyond the Betz Limit of 59.26% energy extraction, more and more air tends to go around the turbine rather than through it, with air pooling up in front. So 59.26% is the absolute maximum that can be extracted from the available power. There are additional losses after Betz. Small wind turbine blades are never 100% efficient, even when running at their favorite speed. No alternator or generator is 100% efficient in converting the energy in a rotating shaft into electricity. There are friction losses from bearings, and from any gearing that's involved in the power conversion. And there are magnetic drag and electrical resistance losses in the alternator or generator. Wind power researcher Mike Klemen did some volunteer math to benefit the wind power community, and came up with a web page about the Perfect Turbine: • http://www.ndsu.nodak.edu/ndsu/klemen/Perfect_Turbine.htm
A "perfect turbine" would work right at the Betz limit, the blades and the alternator would match perfectly at all wind speeds, and the alternator would have no internal magnetic or electrical losses. Klemen also averaged the efficiency of power conversion (called the "Coefficient of Power", or Cp) of several commercial small wind turbines, and got the figure of Cp=35% for what he calls on his page a "Good Turbine", though none of the commercial turbines he tested were able to reach that efficiency. So now you are already armed with the knowledge to detect a wind power scam or a misleading advertisement and there are some out there. Caveat Emptor (Buyer Beware), and TANSTAAFL (There Ain't No Such Thing As A Free Lunch -Robert Heinlein). If an advertisement claims more poweroutput than is even available in the wind, you are dealing with a con artist. If the power output claims beat Betz, you are either dealing with a mis-informed individual or company, or a con artist. And if output claims exceed Klemen's very optimistic Cp=35% guideline, you may have found an exceptionally good turbine, or more likely someone who is not measuring Cp carefully enough with their data acquisition equipment. Though giant utility-scale turbine designers are attempting to close the gap between reality and Betz, a small turbine that gives a Cp of 35% or more would be considered an exceptionally good design right now. Average Wind Another crucial concept to understand about wind power is at what speeds the wind usually comes to us for harvest. Folks that are new to wind power tend to think that if they put up a small, 4-foot wind turbine that's rated 400 watts, they'll be getting 400 watts power input whenever it gets breezy outside. In reality, at most locations the wind comes to us at low speeds 5-15 miles per hour. And we've already learned that low winds don't have much power in them, and that they can only make useful power when swept with a large rotor. Advertised wind turbine "ratings" are currently all based off of peak output in high winds which are relatively rare. Much more important is what the turbine will do in low winds, but this information can only be extracted from power curve charts supplied by the manufacturer. It's easy to look up the average wind speed at your geographic location with the NREL (National Renewable Energy Laboratory) printed and online Wind Resource Atlas: • http://rredc.nrel.gov/wind/pubs/atlas
It will show you your "wind zone" and the average wind speed in that zone. It's a good way to see if wind power is even appropriate for your site, but doesn't give you all the information you need to select a turbine for your location and power needs. The statistics used to calculate the distribution of wind speeds are complicated, but the results are easy to understand. In most locations worldwide, the distribution of wind speeds keeps fairly close to a Weibull or (simplified) Rayleigh distribution of wind speeds, shown below. There are non-Rayleigh locations where the curve takes on other shapes, but these are relatively rare. The distribution shown here is relatively common. 
In the chart, the horizontal axis shows wind speed, and the vertical axis the probability (which can be condensed down to the predicted number of hours per year) that the wind is blowing at that speed. The area under the graph is always equal to one, because the probability that the wind is either blowing or not blowing is always 100%. An anemometer is an extremely valuable tool for evaluating your location for wind potential. Anemometers can be rented, built at home, or purchased. Some models even plot your Weibull distribution for you. See the links at the end of this article for more anemometer information and resources. These concepts are the key to selecting the correctly sized wind turbine for any application select your turbine based on the SWEPT AREA, not the manufacturer's "rated output". Rated output is an almost meaningless figure, it's simply the peak power the turbine can make in high winds. But at what wind speed does it make that rated power? Most manufacturer rated outputs are taken at around 28-30 mph. And for how many hours per year do you get wind at that high speed? In most locations, very few. Most winds come in at a much lower speed, and therefore have much less power available in them. The only way to compensate is with a bigger swept area. One of otherpower.com 10-foot turbine designs in operation. This one was built and flown by our neighbor Tim Fecteau. The web page about the design is at: http://www.otherpower.com/timsturbine.html
In a 10 mph wind (very common), there are 100 Watts of power available with a 5 foot diameter wind turbine. Betz lowers this to 59.26 Watts, and with Klemen's "good" turbine losses we are down to at most 35 watts of output. That's only enough power to fire up a couple of efficient CF light bulbs. By comparison, a 10 foot turbine has 401 Watts available, 238 W with a "perfect" turbine, and 140W output in an excellent turbine design. Much better, but not anything that's going to make your electric meter run backwards! A "good" 20-foot turbine could possibly give 740W at 10 mph. When we double the wind speed to 20 mph, the exponential increase in power available becomes apparent 280 possible Watts from a "good" 5-footer, 1,100W from a 10-footer, and 5,900W from a 20-footer. Now we are talking some real power for a sailboat or cabin (the 5-foot machine), an off-grid home (the 10-foot machine), or an on-grid house trying to offset the power bill (the 20-foot machine). Of course it varies by location, but on a good wind power day that most people would call breezy, the wind will usually be between 10 and 20 mph. Now you are armed with some realistic expectations of how much power different sized turbines can make at different wind speeds. You should be able to whip out your pocket calculator at any time and envision how much power is possible. And here's where some less scrupulous retailers and manufacturers try to promote wind power misconceptions to boost sales but now you are immune to hype! Some examples are listed below, and each future part of this series will have some hype-proof and misconception-busting information related to its topic. These examples are all fictional but you'll find great similarities to real ads if you prowl Ebay and Google for wind turbines. 400 Watt Wind Turbine only $500! More power than $1,600 worth of solar panels! No Reserve! That 400 Watt wind turbine rating will be peak output, probably in 28-30 mph winds. Check your Rayleigh distribution chart, and estimate how many hours per year that you'll see 30 mph winds. Not many! While in the meantime your 400 Watts of solar panels will be making the full 400 Watts for many hours per week. Comparing solar to wind is like comparing apples to oranges. A good renewable energy system will use BOTH solar and wind. This remarkable innovation can make 3,000 Watts of power in 13 mph winds, all from an unobtrusive 6 by 6 foot box! Get out the calculator, and you'll see that they are claiming over 7 times more power output than is even available in the wind. It's a scam for sure, because it defies the laws of physics. Don't want a big, unsightly wind turbine in your yard? Buy 3 of these small, 400 Watt turbines, and get as much power as a big, ungainly and expensive 1,200 Watt unit for half the price! Think back about power available in the wind and its factor of 8, and swept area and its factor of 4. At the rare rated peak output, which is probably around 30 mph, the 3 small 400W turbines might indeed be making near the same power as one big 1,200W model. But what about performance in your far more common low winds? The large turbine would be spinning and making some power, while the small ones most likely sit still, making nothing. 900 Watt Wind Turbine! Under 3 feet in diameter!! No Reserve!!! A quick check with pocket calculator shows some problems. Running the power available in the wind equation at 30mph, even Klemen's exceptionally "good" turbine guideline gives only 600 Watts output with a 3-foot rotor, so something is fishy here. A quick check of the turbine's specs shows that that that 900W rating is for "65 mph winds" which are extremely rare. Commercial turbines are all given their ratings at around 30 mph that seems to be the industry standard. This last example of hype again shows exactly why you should select a wind turbine based on swept area and not rated power output. There has been much controversy and discussion on the internet recently regarding rated output, since folks that are flying wind turbines can observe with their own power meters how useless peak power ratings at 30 mph really are, and how infrequently that output level occurs. The problem is that wind turbines manufacturers NEED some way to quickly and easily present their performance data to the public. 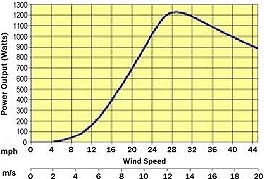 Sample power curve diagram: Wind turbine instantaneous power curve chart from a very reputable manufacturer. This one is for a Bergey XL.1, an 8.2-foot diameter, 1,000 Watt machine. Chart source: http://www.bergey.com
For example, I could rate a nice 10 foot turbine at only 400 Watts, and that would very accurately reflect what it can make in common 15 mph winds. But no one would buy it, since they could get a 400 Watt turbine with only a 4-foot diameter from another manufacturer for a fraction of the cost and are not aware that the turbines are rated at vastly different windspeeds. The 10-footer would make far more power in all winds and far more power per year, but by comparing the peak output data the uninformed buyer would assume they would perform the same. Really, the only way to accurately rate wind turbines is by comparing their measured power curves, and most consumers are not willing to sit down and crunch the math. Swept area is the most important concept in choosing a windturbine, but it's very difficult to get that concept across to an under-informed public. Hopefully YOU now understand some of the issues involved in figuring how much power is available in the wind with different sizes of wind turbines. The next article in this series will cover the details of why wind turbine blades are shaped as they are, how electricity is generated by that spinning shaft, and how wind turbines regulate their output and protect themselves from extreme winds. Remember that factor of 8 increase in power when wind speed doubles? This massive increase in power can blow a wind turbine apart, and the turbine design must be able to compensate to keep incoming power at a reasonable level. Links you may find interesting Excellent Danish wind power tutorial website, including formulas and online calculation programs for wind power: • http://www.windpower.org
Home-built wind turbine resources Wind turbine building information • http://www.otherpower.comHugh Piggott's superb home-built wind turbine website • http://www.scoraigwind.comThe otherpower.com discussion board, where wind turbine builders worldwide meet to exchange questions, information and photos • http://www.fieldlines.comHomebuilt data-logging anemometer information • http://www.otherpower.com/anemom2.htmlInexpensive logging anemometers and Windows wind data logging software • http://www.inspeed.comFancy logging anemometers with Rayleigh functions • http://www.nrgsystems.comPart 2 (August 2005) online at http://www.otherpower.com/windbasics2.html
 Surviving high winds
All wind turbines must have a way to deal with this massive increase in available power as the wind speed goes up. In Part 1 of this series (see ESSN July 2005), we discussed the distribution of wind speeds, and how most wind comes to us at lower speeds. So, manufacturers try for the best performance between 7 and 30 mph, and design the turbine to simply "survive" winds higher than that while still producing near peak power. If the turbine was allowed to keep making power over 30 mph, it would - but only to the maximum power production rating of it's generator or alternator, which can't harvest much more power beyond that rating - so the huge amount of extra power in the wind will cause overheating, overspeeding, and possibly burn out the generator or cause the turbine to shed a blade. One very effective way to regulate incoming power is variable pitch blades. The blades can rotate in the hub and change the angle at which they hit the wind. All large utility-scale turbines use this method, regulated by sensors and active controls. Only a few small turbines use variable pitch blades, notably the Jacobs. Jacobs has been building the system since the 1920s, and you can still buy one new! The system is not high-tech, but is extremely effective - the blade pitch changes mechanically using a flyball governor and centrifugal force. In low winds, the blade pitch is very steep, and at peak output the blade pitch is very flat - this matches the blade's angle of attack to the apparent wind (more on apparent wind later). If winds increase more, the blades pitch past flat, causing aerodynamic stall to prevent overspeeding. 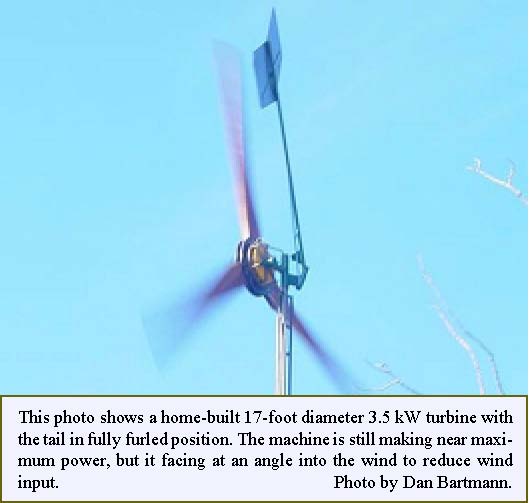 Furling tail
This is the most common high wind regulation technique in small wind turbines. The turbine frame is designed with a built-in offset, and the tail or the generator head is hinged both upwards and inwards. When windspeed starts to approach the generator's maximum power output capacity, the tail or head folds up, yawing the machine at an angle to the wind.This reduces the effective swept area and thus the available power to the maximum power output level of the generator, so it continues to make peak power while furled. When wind speed drops, the tail or head drops back into a normal configuration via gravity and tracks the wind straight on once again. Twisting blades Some very small wind turbines use flexible plastic blades that bend, twist and flutter when power input gets too high for the generator to handle. This technique is effective, but also noisy. Some of the extra power in the wind is being turned directly into noise, and the sound of blades fluttering at high speed is very distinctive. It's only used on very small turbines, and is effective only using modern plastic blades that are highly resistant to fatigue. Mechanical and air brakes These regulation techniques are no longer used in commercial turbines because they are very noisy and prone to mechanical failure from fatigue, rust, and ice. Nevertheless, I have to admit it's exciting watching and hearing a 1930s vintage Wincharger deploy its air brakes during a gale! Emergency shutdown All wind turbines should have some mechanical or electrical way to shut them down (stop the blades from spinning) during severe weather events. These can including shorting the alternator phases, a crank that turns the tail into fully-furled position, or a mechanical brake. There's no sense in abusing your expensive turbine and tower by letting the machine run during a hurricane, severe thunderstorm, or tornado, since the machine will make no more power in 100 mph winds than it will in 30 mph winds if it is furling properly. Unless you are working with a tiny "science fair project" windmill that's capturing wind from an electric fan, some sort of regulation is needed or bits will fall off! Beware of any wind turbine whose builder claims that it doesn't need to furl because it is built so sturdily (tested to 100+mph!). But how many times and for how long can it withstand such abuse? Also beware if the builder advises you to lower the turbine to the ground if high winds are forecast - it probably lacks a shutdown system. Wind Turbine Types If you are considering buying or building a wind turbine for making electricity, you'll almost certainly be comparison shopping for a modern, electricity producing, lift-based horizontal axis machine. But by taking a look at some historical wind turbine designs, it gets easier to explain the physics concepts involved. Drag vs. Lift Wind turbines are divided into two types, drag machines and lift machines, based on the aerodynamic principles they utilize, and two more types - Horizontal Axis and Vertical Axis machines - depending on their physical configuration. Designs that use drag to make them spin are the oldest way to harvest wind power, and the easiest to understand. The blades or cups push against the wind, and the wind pushes against the blades. The resulting rotation is very slow. And the blades or cups that are swinging back around after making power are hurting power output because they are moving in the wrong direction, against the wind. The earliest examples of drag-based wind power design are grain grinding and water pumping machines from Persia and China, with records dating back to 500-1500 AD. 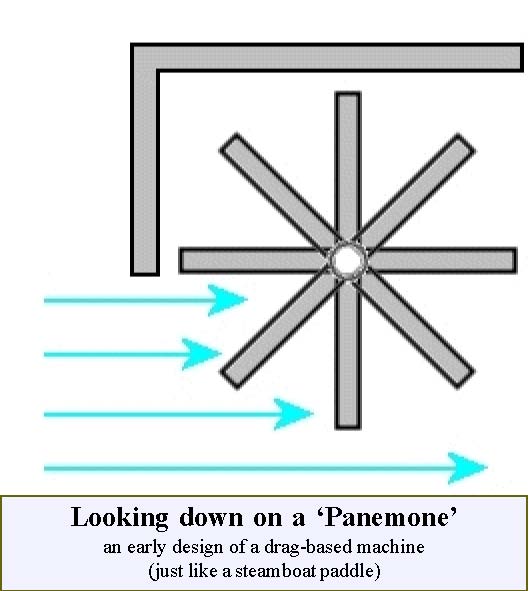
Note the wall that's erected around the half of the machine that is hurting performance by moving against the wind. In any drag-based design, the blades can never move faster than the wind. This turns out to be a critical concept for both efficiency and the ease of generating electrical power. Lift-based wind turbines are the standard now, but lift concepts have been in use for thousands of years. Mariners as early as 3200 BC used lift whenever they took a boat with sails out onto the water and turned the sails to give the boat maximum speed. An airfoil shape (just like the cross section of an airplane wing) gives lift, and has a curved surface on top. Air moves over the curved top of the airfoil faster than it does under the flat side on the bottom, which makes a lower pressure area on top, and therefore an upward force - that's lift. The key concept of lift and wind power is that lift forces allow the blade tips of a wind turbine to move faster than the wind is moving. Horizontal Axis Wind Turbines (HAWTs) and Vertical Axis Wind Turbines (VAWTs) HAWTs are what most people first think of when someone says "windmill" - blades moving perpendicular to the ground. In a VAWT, the blades move parallel to the ground. Both HAWTs and VAWTs can be either drag or lift based, though only lift designs are commonly used as they are reasonably efficient for electricity generation. Below are some commonly seen wind power designs, and explanations of the principles on which they work. 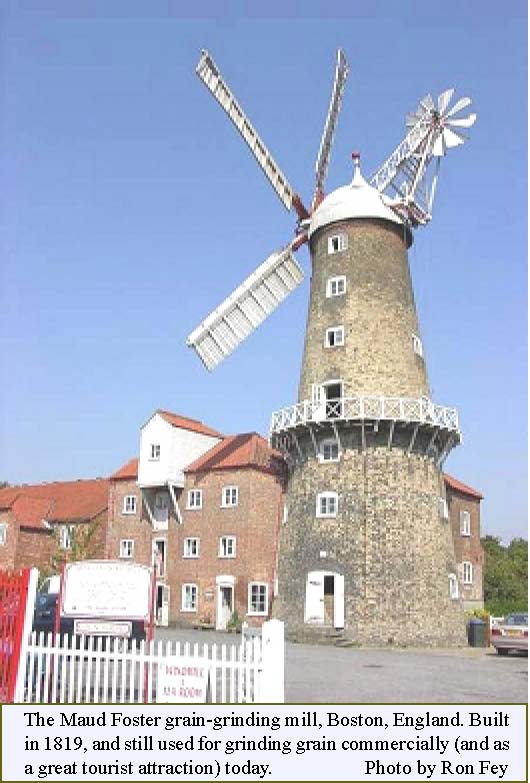 "Dutch" HAWTs
While not exclusively Dutch in origin, these machines were built all over Europe for grinding grain, and the earliest ones were drag-based. The Dutch made major improvements circa 1390 AD by incorporating lift into the blade design. The machine was pointed into the wind manually by the operator.  American Waterpumping HAWTs
Over 6 million of these were installed on farms and ranches across America, starting in the mid 1800s. A typical Aermotor water pumping windmill, still common and in operation all over the American West. Photo courtesy of DeanBennett.com, Denver, CO. This company sells all the replacement parts to keep these beautiful old machines running, and also sells new waterpumping windmills. They were used purely for mechanical power to drive a pump shaft in a well, and point into the wind via a tail vane. Many of these antiques are still in use, and some are still manufactured new! Companies like Dean Bennett in Denver, CO, USA still sell all the replacement parts to restore and maintain waterpumper mills, and also sell brand new machines. These designs are mostly drag-based, providing high torque for the pump shaft, but low blade speed. This makes them difficult to use for electricity production, but excellent for moving that heavy pump shaft. Modern Electricity-Generating HAWTs: They come in sizes ranging from tiny (4 foot diameter, to mount on a sailboat or remote cabin) to huge (300 foot diameter, multi-megaWatt, utility-scale machines). These machines can be designed for either "upwind" or "downwind" operation. In upwind turbines, the blades are in front of the tower toward the oncoming wind, and point into the wind using a tail vane or (in giant turbines) electronic controls. Downwind turbines don't have a vane, and the blades are behind the tower relative to the wind. While upwind designs are the most common, there are excellent downwind machines commercially available. All modern electricity-producing HAWTs are lift-based, so the blade tips can travel faster than the wind. The resulting high RPMs are ideal for producing electricity, and these machines can be highly efficient. Small machines are approaching 35% efficiency (Cp=35%), while utility-scale machines are rapidly approaching the Betz Limit (Cp<59.26%, see Part 1 of this series, ESSN July 2005). Drag-based VAWTs The ancient Persian design shown before, the Panemone, is one example. Other designs include the Savonious Rotor which can be easily built using coffee cans, plastic buckets, or metal barrels. 
[Photos courtesy of the American Wind Energy Association AWEA] A simple anemometer is another drag-based VAWT design. While fun for experimenters and students to build and test, these designs are extremely inefficient, and give only low torque since the blades or cups can never travel faster than the wind. Yes, I know ... anemometers often spin quite fast, but as they usually have a very small arm length, they have very little torque. Lift-based VAWTs Darrieus, Giromill, and H-rotor designs are big improvements over drag-based machines, since the blades have airfoils and utilize lift to move faster than the wind. However, there are inherent difficulties with any VAWT design, and these problems are why VAWTs have never been very successful in the commercial market, on either small or large scales.
Should I choose a HAWT or a VAWT for my installation? If you are looking for a fun wind power experiment or science fair project, a VAWT might suffice. You can find some good ideas here. If you really need to make some serious electricity to power an on- or off-grid home, a lift-based HAWT is the best choice. Plus, you'll have a very hard time even finding a commercial VAWT from a reputable manufacturer for sale in any size. The disadvantages of VAWTs are numerous: VAWTs must be built at least twice as big as HAWTs to make the same amount of power, since half of the machine is moving in the wrong direction (towards the oncoming wind) at any given time (remember the Panemone?) Because of this, VAWTs go through a fatigue cycle on every rotation. This means the design must be very strong and sturdy - which also translates to higher cost and more weight. More weight also mean that the tower must be more sturdy, another added expense. All wind turbines must be flown high in the air to get above obstructions. Near the ground, on a rooftop, or in any direction from obstructions such as buildings, slopes, or trees, turbulence steals large amounts of power and causes unnecessary fatigue in both HAWTs and VAWTs. In general, VAWTs are also lower in efficiency than HAWTs. Drag-based designs of any kind are the worst because maximum possible efficiency (Cp) is directly related to how much faster than the wind the blade tips are moving. This ratio of blade speed to wind speed is called the Tip Speed Ratio (TSR), and the best possible Cp is obtained around TSR = 5-6. Only lift-based VAWT designs can even approach this TSR, and are still limited by the other factors listed above. 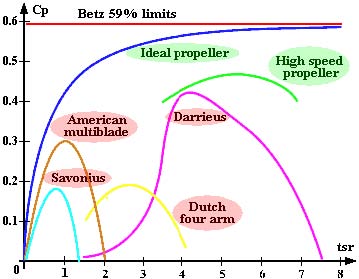
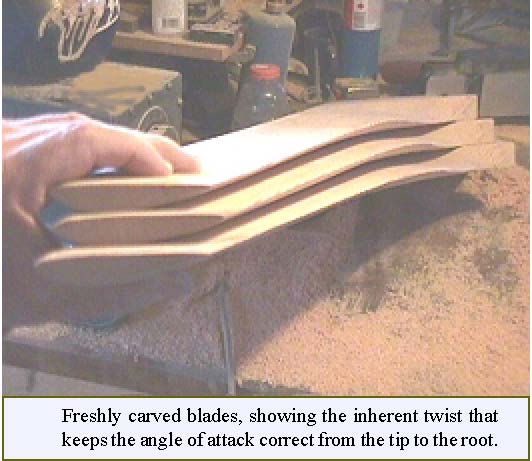
[Courtesy of windturbine-analysis.com] This diagram shows the maximum Cp theoretically possible, versus Tip Speed Ratio, for different wind turbine designs. Wind turbine blade and rotor design Many people are surprised the first time they look at wind turbine blades and rotors close up. The flat sides of the blades face the wind, and they have a distinctive twist to them, from a steep pitch at the root to a very shallow pitch at the tip. Why is this, and why do some turbines have more blades than others? With HAWTs, the blades are inclined to the oncoming wind and constrained to move around a horizontal axis of rotation. They start to move by deflecting the wind, just like a rudder inclined to the flow of water forces a boat to change direction. However, like an aircraft wing, their airfoil cross section adds lift to the blades as they speed up, and greatly increases the rotational force. The blades are wide at their base and taper as they go out because the tips move faster than the base. They are also twisted so that the angle off BLADE TWIST attack decreases from where the air is moving relatively slowly. 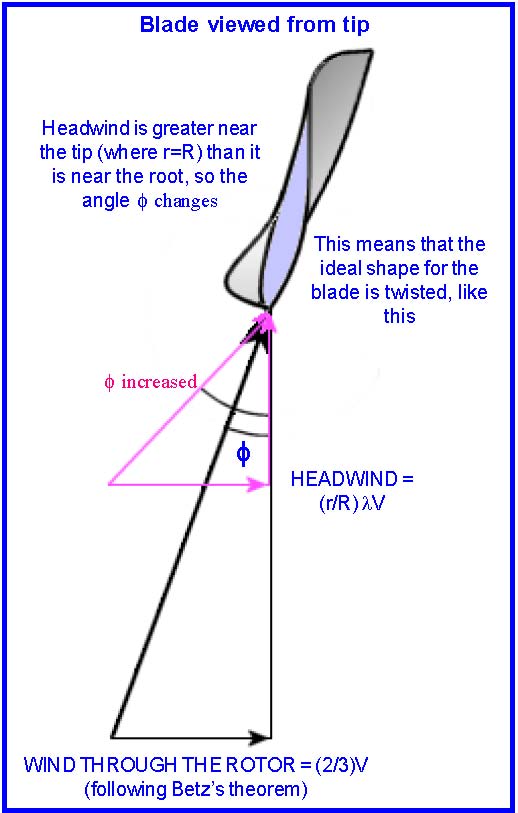
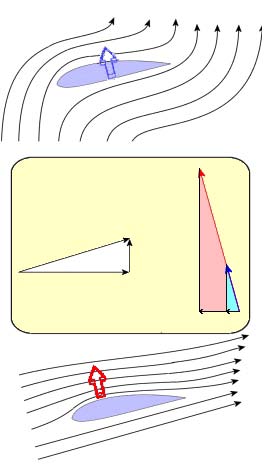
When the angle of attack is wrong for the apparent wind, the airfoil stalls and ceases to produce lift - the same thing that happens when an airplane tries to climb too steeply for its speed and begins to fall. When a wind turbine rotor begins to start spinning from a full stop, it is always stalling. As the wind increases and the blades pick up speed, the angle of attack gets better and better, and the turbine accelerates dramatically from the added lift force. It's fun to watch this happen! And a turbine can stall at higher windspeeds too - it will no longer pick up RPMs as the wind increases. This is not frequently observed, as the turbine has usually furled by that point to reduce wind input. As the number of blades and the amount of the swept area that's taken up with their surface area increase (this ratio of blade surface area to swept area is called "solidity"), more torque and less RPM are produced, the tip speed ratio is lower, and the blades must be proportionally narrower. The typical 3-bladed rotor is the best compromise for physical strength and rotation speed. MORE MYTHS There are many myths going around about wind turbines, especially VAWTs. Unfortunately for VAWT enthusiasts (some of whom are probably already drafting irate emails to me), almost every wind turbine investment scam (ranging from small scale to utility scale) in the last 50 years involved VAWTs. The reason for this abundance of scams is simply that VAWTs look new and different, and are intriguing to the public. Some examples (fictional, but similar to actual advertising claims): Invest now in this unobtrusive, world-changing, previously suppressed, new technology that will put a (insert company name) wind turbine on every rooftop in America, solving our energy crisis and oil shortage problems! First of all, VAWTs are not new technology - see the ancient Persian Panemone VAWT pictured before. The technology has not been suppressed - The US Government NREL, DOE and Sandia laboratories have extensive tested and computer modelled VAWT performance. Furthermore, rooftop installations are not practical - turbulence affects both HAWTs and VAWTs, and they must fly in smooth air, well above any obstructions. Now take the average energy usage for an average home - about 9000 kW/h per year in the US, and 5000 kW/h per year in Europe. Take the yearly power production estimates from a reputable wind turbine manufacturer at a reasonable average wind speed (say 5 m/s, 11 mph). For a Bergey XL.1 (8.2 foot diameter rotor), Bergey estimates 1800 kW/h per year. So you'd need 5 of these flying on tall towers and above all obstructions to possibly power your 9000 kW/h per year house. Now remember that VAWTs must be twice as large as HAWTs to make the same power. The 5 Bergeys would sweep 284 square feet. The VAWT would have to sweep 567 square feet to get the same power output - that means a machine at least 24 feet high by 24 feet wide, mounted at least 20 feet above the nearest tree or building. That doesn't sound either practical or unobtrusive. Hold on tightly to your wallet, and consult an investment counsellor before spending money. Wind turbines with only 2 or 3 blades let too much wind slip through and be wasted - my Savonious VAWT (or multi-blade waterpumper-type) design will capture ALL the wind. This is a myth! The Betz limit of Cp<59.26% applies to both HAWTs and VAWTs. Behind and in front of every operating wind turbine the air is moving slower, and the wind tends to go around the machine instead of through it. Plus, both the Savonious and American Multiblade designs are mostly drag machines, and therefore very limited in efficiency because of their low Tip Speed Ratio (see chart on previous page). Modern utility-scale wind turbines are coming close to the Betz limit, but drag designs have little chance of ever coming near even half of it. More blades means you get more power! Replace your existing 3-blade rotor with our 6/8/12/16 bladed rotor and outperform all 3-blade designs. Not a good idea, you'll actually get less power from your existing machine! Wind turbine alternators and generators are designed to work in a specific RPM range, and lowering their RPM and TSR by adding more blades means you get less power, not more. The torque will increase, but that doesn't help your electrical generation at all. For the same reason, it's not practical to convert an American Multiblade Waterpumper windmill to make electricity - the RPMs are much too low, and adding any kind of gearing to increase shaft speed seriously hurts power output, especially in (the most common and most important) low wind speeds. 3 blades are the best compromise of RPM vs. torque. Any design with high solidity won't be suitable for producing electricity efficiently. Part 3 (September 2005) online at http://www.otherpower.com/windbasics3.html
Siting Installing a wind turbine close to the ground is very much like installing solar panels in the shade - a large part of your investment is wasted. General guidelines are that wind turbines should fly 30 feet above any obstruction within 300 feet. Windspeeds increase as you go higher, and turbulence decreases. Turbulence affects all wind turbine designs, and besides dramatically reducing potential power, turbulent winds near the ground buffet any turbine, causing serious stress on all components and sometimes premature failure. In general, urban and suburban wind turbines are possible only on a very small scale because of local building codes and impact on neighbors. And "small scale" means a very small turbine, which won't do much to offset the typical power use of a typical suburban home. (see parts 1 and 2). Most building codes require that any tower have a "fall zone" that does not impact any neighboring property, and also restrict the height. Locations near airports have tower codes even more strict, and your relations with neighbors regarding aesthetic and noise concerns must be addressed. If you are on a small urban or suburban lot with many houses nearby, your best bet may to be to invest the money you considered for a wind turbine into refitting your home with energy-efficient lighting, appliances, and heat, with the future option of a photovoltaic system in mind too. If you are in a more rural area and can comply with local restrictions, it's important to put your tower as high as you can at the best possible location. This is expensive - in general a good tower will cost at least as much as the wind turbine that will fly on it! Local geography, property lines, and cost may limit your tower options. Up here in our remote mountainous area, many of us are forced to cheat the 30-foot -above-300-foot rule all the time. The key factor is, how much are you investing in your wind turbine and tower? If it's homebrewed and inexpensive, just fly it as high as you possibly can - if you built it, you probably know how to fix it. If turbulence from being flown too near the ground causes a failure, your loss is only some repairs and engineering lessons learned. If you just dropped big money on a commercial turbine, you'd be crazy to fly it too low - and no commercial installer would even touch the job! Seek expert opinions, they often cost only a couple beers. Photo Comparison of Sites So let's have a look at a few pictures taken at real sites to see what makes them suitable, or not. We'll start with a couple of good ones. 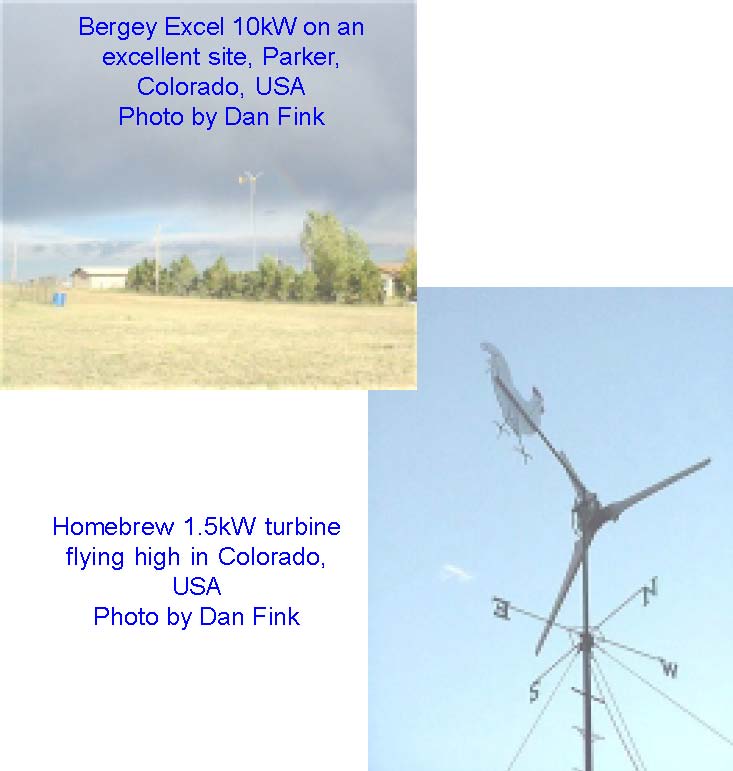 Homebrew 1.5kW turbine flying high in Colorado, USA Photo by Dan Fink 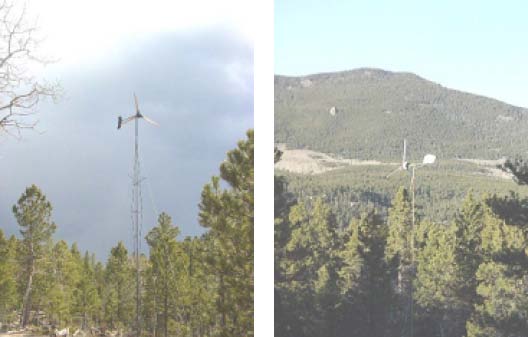 This could perhaps be a "little" higher?!
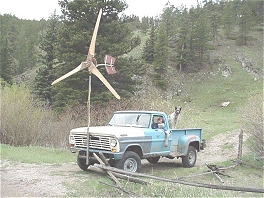
Homebrew turbines flying at pretty good sites, Colorado, USA. Both could use another 10-20 feet of tower (notice local tree heights) [photos by Dan Fink] Opinions vary on whether detailed wind data acquisition should be used for a siting decision, or simply general wind data for the area. My opinion is that the cost of your pre-purchase data acquisition should directly correlate to how much you are planning to spend on the installation. Are you looking at spending US$30,000 for a 12 kW Bergey to offset your home or business power use on the grid? Darn right, erect a meteorological (MET) anemometer tower and collect data for a year or two, then take it to an expert analyst. Planning to spend US$3000 on a small commercial or mid-size homebuilt wind turbine for an off-grid home? Put up some inexpensive An alternative car alternator - or is it a swamp buggy? logging anemometers on PVC pipe masts, and watch your input during windy months or for a whole year. US$800 on a tiny wind turbine or homebuilt mid-size model for your vacation cabin? Just do it! Keep in mind how much power you can expect from different sizes of turbine in your area, and the importance of flying it as high as possible. 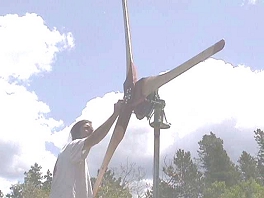
Useful data on wind power potential at a given site can be gleaned by simply observing the wind first hand. Ridge tops are usually the best turbine locations, so how tall are the trees on your ridge? How big a tower do you need to get 30 feet above them? About how fast is the wind blowing each time you visit? Keep a log. And how fast are the trees growing in height each year? Do the trees on your ridge have more branches on one side than the other? Such tree "flagging" can also be a rough indicator of wind potential at a site. Also, talk to neighbors that have lived in the area a long time. 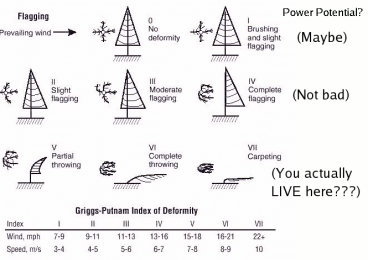
GP Index - Courtesy NREL Wind data logging can be as simple and cheap or as complicated and expensive as you choose to make it. If you are planning a substantial investment, choose your logging equipment accordingly. Some government and non-profit organizations are making advanced wind data logging systems available on loan for zero or small cost - search Google for "anemometer loan program" to find details for your area. A professional-grade, ready-to-fly logging MET anemometer system (including 30-meter tilt-up tower) can be had from NRG Systems for a cool US$3000 - intimidating, but not if you are looking at spending US$30K on a turbine. US$600 to NRG systems will get you an excellent professional instrument, even capable of plotting the Weibull distribution of your wind speeds (see part 1) - you build your own tower or tree mount for it, and be sure to fly it high or else turbulence will compromise your data. Home weather stations by Davis Instruments, Oregon Scientific or LaCrosse come in at around US$300. For bottom feeders like me, US$40 will get you the parts to build a homebrew Anemometer built from a bicycle speedometer, or an even cheaper Easter egg anemometer. And check out the Vortex anemometer from Inspeed.com for a US$60 commercial versions of the bike speedometer anemometer, and a US$99 anemometer with computer interface and software that give an on-screen display and also puts your wind data directly into a spreadsheet file. 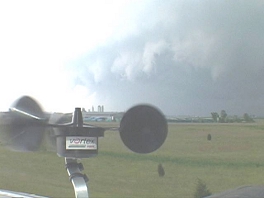 Chasing a storm with a Vortex anemometer [Courtesy Inspeed.com] Towers There are two basic types of towers for wind turbines: Fixed - The kind you have to climb. If you (or a friend, or a professional wind turbine installer) don't mind high climbing and know the necessary safety precautions, harnesses, and knots, a lattice tower with 3 guy wires can be very cost effective. The tower sections, and finally the wind turbine, are raised one at a time using a gin pole and davit, or the whole thing at once with a crane. Lattice tower sections are often available used or as surplus. Freestanding, fixed towers are more expensive: wider at the base and narrow up towards the top, but they need no guy wires. At very steep, craggy or tree-filled sites, fixed and freestanding towers have the advantage that a much smaller "footprint" of level ground free of trees is needed. 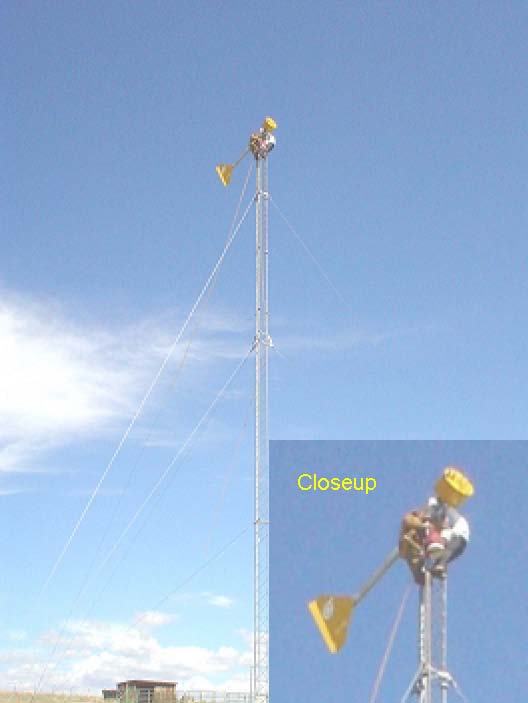 Professional wind turbine dealer, installer and mechanic Victor Creazzi of Aerofire Wind Power on a routine service call. Seriously acrophobic Dan Bartmann of Otherpower.com is assisting. Victor wisely refrained from any "tower-top humor" after he got DanB up there! The turbine shown is an Atlantic Orient located at the NREL, NWTC, Golden, Colorado, USA [Photo by Dan Fink] Typical freestanding tower with no guy wires. Requires a large concrete base. Tilt-up - This is a great alternative for non-climbers, though it is often more expensive. A tilt-up tower has the big advantage that you can do all your adjustment and maintenance to the turbine while it's on the ground, instead of while you are hanging from the tower top. It also uses a "gin pole" to raise it, but in this case the gin pole is a lever arm that stands straight up when the tower is down, and lays along the ground when the tower is up. Tilt up towers use 4 guy wire locations instead of 3, and the guy anchors must be perfectly square to the tower base. Tilt-up towers are generally made of steel pipe, which is heavier and more expensive than lattice. The prospect of high climbing a fixed tower might convince you that the added expense (and required large level area, clear of trees and obstructions) of a tilt-up is justified. 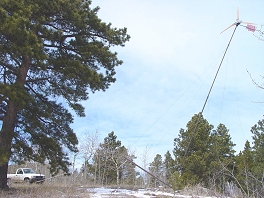 A 40-foot tilt-up tower being raised via pickup truck and gin pole. Colorado, USA [Photo by Dan Fink] The tower base actually does not receive much stress compared to the guy anchors - once the tower is erected, all of the force on the base is straight down, from the weight of the turbine and tower. Fixed towers require a chunk of concrete at the base, and the manufacturer's specs will tell you how much mud to pour. A metal plate is bolted into the concrete and the lattice sections attached to the plate. Freestanding towers need even more concrete - with no guy wires, the weight and depth of the base are critical. Again, follow the tower manufacturer's recommendations. Tilt-up towers benefit from a concrete base because of the side forces when raising or lowering the tower, but some perfectly good commercial designs use a flat metal base that's simply spiked directly into the dirt. What's most important is the strength of the guy wire anchors, which are usually either concrete or (when digging is impossible) large metal pitons sunk into holes drilled into the rock, and further secured with masonry epoxy. Fixed towers give you a little leeway on exactly where the 3 guy anchors are placed, but tilt-ups don't. If the 4 guy anchors on a tilt-up are not perfectly square and level with the base and each other, the side guy wires may alternately tighten and loosen during raising and lowering. This requires diligence and very slow action by the owner during erection, because wire rope guys don't give any visible indication of how much tension they are under - they look the same whether there's 100 pounds of force on them or 1000. A broken guy wire can be a disaster for the turbine, tower, and could even kill the owner. Seek expert advice if you've never raised a tilt-up tower before! It would be wise to do the same if you're thinking of a fixed one, too. Lightning Protection and Wiring Wind turbine towers must be properly grounded or induced current from a nearby lightning strike could fry the rest of the components of your power system. Generally, the metal components of the tower and turbine are grounded to one or more ground rods near the tower base. The electrical wires from the turbine are NOT bonded to this ground - they run into the house, and are grounded by the power system's main ground. Very tall towers may have a ground rod at the base plus an additional ground rod at each guy anchor, with all guy wires that connect to that anchor bonded together. The wires from the turbine to the house must also be properly sized to avoid too much resistance heating loss. Follow the manufacturer's recommendations, and be sure to factor in the tower height when making your calculations. Many turbine manufacturers no longer make their mid-size models in 12V configurations, it's now 24V or 48V only. Low voltage 12V systems will need thick, expensive wire, and internal losses in the turbine's generator are also a problem at 12V. If you are pricing wire for installing a 12V turbine a few hundred feet from your house, you'll quickly see the advantage of upgrading to a 24V or 48V power system! Power Regulation Almost all small off-grid wind turbines use what's called a "dump load controller" to regulate their power input to the system. The raw output of a small wind turbine is "wild AC", meaning it varies in both frequency and voltage and is not directly useful for much of anything. The controller converts this to DC for charging the home's battery bank, and the batteries themselves regulate the incoming voltage level. They keep it down to their own voltage, UNTIL the batteries are full - at that point, they can't regulate the voltage any more. Solar panels can simply be disconnected from the system, but disconnecting a running wind turbine (letting it "free wheel") can be a disaster. The turbine will overspeed and possibly come apart. It must always be connected to a load. That's where the dump load comes in - when the batteries fill, the controller starts diverting all or part of the incoming power to electric air or water heating elements in your house to keep a load on the turbine without wasting the incoming power. Commercial turbines come with this system included, and homebrew builders usually make their own heating element arrays and use a commercial controller (such as a Trace C-40 or C-60) set in dump load mode to handle the diversion. Grid-tied systems are regulated in a similar way. If the system includes batteries, the only difference is that the grid itself is the dump load, and any extra power beyond what your home is using runs your electric meter backwards. In systems without batteries, a special grid-tie inverter is used (one example is the WindyBoy) to convert the turbine's wild AC directly into sync with the grid. Noise, Birds and Bats After your wind turbine starts flying, you'll start getting questions from friends and neighbors about noise, dead birds, and dead bats. There are some pretty noisy commercial wind turbines on the market, but most are extremely quiet. If noise is a concern for you, be sure to talk with your dealer or installer and visit some working small turbine installations to hear the noise for yourself. I usually describe the sound of our homebrewed turbines up here as about the same as someone riding by the house on a bicycle. In higher winds, the turbines make a bit more noise, but the noise threshold is just barely above the sound of the wind in the trees. Bird kills (and more recently, bat kills) are a big issue for the under-informed, and those people who are against wind power development. In reality the issue is minor and stems from early utility-scale wind installations such as the wind farm at Altamont Pass in California 30 years ago. This installation was inadvertently sited in a bad area of the local ecosystem, full of raptors. Commercial wind farms have been sited with birds in mind for many years now, and derisive names like "Raptor-matic" and "Cuisinart in the sky" are just anti-wind-power hype. The biggest modern killers of birds are power lines, cell phone and other communications towers, pesticides, and domestic cats. See Mick Sagrillo's article on bird kills for the AWEA for more details. We have over a dozen wind turbines flying in our local off-grid area, and no one has reported a single bird kill, ever. The bat kill issue has only cropped up recently and only at certain installations, but the problem is currently being worked on by the best and brightest ecologists and engineers. Just like the bird problems 30 years ago, the issue seems to stem from bad siting of the turbines in bat flight paths instead of any intrinsic danger from the blades. Zero dead bats reported up here. Though we recently got to witness a pair of male Broadtail Hummingbirds engaged in an aerial duel in, around and through the blades of a local turbine running during high winds - an amazing display that caused no harm to the birds, and was like watching the Ornithological Olympics for us! Wind Turbine Watching Before my wind turbine went up, I cursed the constant February winds that blast our high mountain location. Now, I see the wind in a new perspective. In fact, I find watching wind turbines to be much more entertaining then watching television. Those first slow rotations in a gentle breeze provide the anticipation, and the excitement kicks in when the wind gets strong enough to give the correct angle of attack on the blades to provide lift (see part 2 in the August 2005 edition of ESSN) - the acceleration is dramatic. And then watching a turbine furling in high winds is a lesson in physics beyond compare. Be sure to find a spot in your house where you can sit and watch your turbine through a window, and see both your anemometer and power input meter at the same time. In addition to the wind power that you are harvesting, you'll gain power by shutting off the TV too!  The article on Wind Power that you have just read was written by Dan Fink,
seen here top left playing the Washtub Bass and vocalizing in
enthusiastic harmony with his fellow members of the
Dog Mountain Band.
Dan Fink is not just a skilled musician, playing the Banjo, the Dobro guitar and the Kazoo in addition to the Washtub Bass, but in his spare time is the technical director for Forcefield in Fort Collins, Colorado, USA ( http://www.otherpower.com
and
http://www.wondermagnet.com).
He has lived off-grid, 12 miles from the nearest power or phone pole, for 14 years, and maintains Forcefield's websites and servers via a satellite internet connection. His home is powered entirely by solar and wind, so he knows what he is talking about!. Dan's articles have appeared in such magazines as Back Home, Home Power, and Zymurgy. In his spare time, Dan is a volunteer firefighter for the Rist Canyon Volunteer Fire Dept. |

